If you’re a twenty-something like me you probably don’t have
many Christmas decorations of your own (yet!). If you read A New Christmas Tradition you’ll know that here at WTD
we’re re-vamping the holidays and are trying to make our own traditions this year. As always, we try to do things in the thriftiest way possible
but that never means skimping on
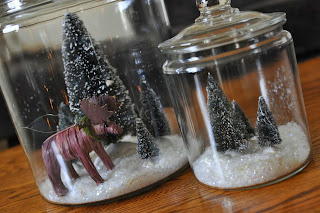
style, class or quality! Today's holiday DIY is a festive Anthropologie inspired snow globe!
 |
| My snow globes are hanging out on my kitchen table this year! |
What you’ll need:
- 3 mason jars (I chose two smaller jars and one large one you can decide what works for you)
- 3 miniature Christmas trees (I found mine at Dollarama and they are there again this year!)
- Fake Snow (I also bought at Dollarama)
- 1 glue gun
- Ribbon (I used two pieces of red and one red and white checkered print. Use whatever you have)
- Something to raise your tree up I think I put a piece of foam under mine
 |
| The Instagram I posted after making them in 2012! |
I didn’t take pictures of step-by-step directions as I made mine last
year but they are so easy you won’t need them. Luckily, this
is a popular craft so I’m going to source some photos online to help you
along.
Step One
Take the lid off the mason jar and pull the ring away from
the round disc.
Step Two
Use your hot glue gun to glue your base to the middle of the
disc. Giving your tree a little height allows you to add more snow. Otherwise
the snow covers the tree. Let dry.
Step Three
Glue the tree to the base. Let dry.
Step Four
Put snow into the jar. The amount will vary depending on the
size of your tree and what looks best to you.
Step Five
Put it all together! Try not to spill the snow :)
Step Six
Tie ribbon around the ring.
Voila! How easy was that? Now all you have to do is find a
cute spot in your home to showcase these
awesome snow globes.
If you want to get even thriftier try some variations. I like the Anthropologie salt shakers and the antique blue mason jars I found on google images!
Variations:
If you want to get even thriftier try some variations. I like the Anthropologie salt shakers and the antique blue mason jars I found on google images!
Variations:
 |
| Salt Shaker Globes |
 |
| Antique Jars |
 |
| A Simple Kind of Life |
A Simple Kind of Life also tried one globe with gold glitter. I like it! You could also mix glitter in with your snow for a more glamourous look! The only warning she had was that a layer of glitter does float to the top.
 |
| Kayla Danielle |
 |
| Gorgeous display of globes! |


No comments:
Post a Comment